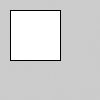
// begin processing example
rect(10, 10, 50, 50);
In the first example, we use the rectangle function. To call a function, you need the correct function name (rect) followed by arguments in parathenses. For the rectangle function, it accepts four arguments: numbers representing upper left corner X, Y, width and height in pixels.
The line of code ends in a semi-colon called a terminator. This tells processing that has reached the end of a complete line of code.
Comments can be added to your code to leave helpful notes to yourself or others that might read your code. Single line comments begin with a double slash //. In this case, "begin processing example" and "end processing example" don't have any impact on how the code runs. Those lines are there only for clarification.
Stacked with Flow of Control
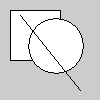
// begin processing example
rect(10, 10, 50, 50);
ellipse(56, 46, 55, 55);
line(20, 15, 80, 90);
Flow of control determines how multiple lines of code are handled. In this case, the function calls to ellipse and line follow the rectangle. As a result, those shapes are drawn after the rectangle and appear over the retangle. Later we'll study ways to alter flow of control.
Color (Grayscale and RGB)
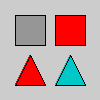
fill(150);
rect(15, 15, 30, 30);
fill(255, 0, 0);
rect(55, 15, 30, 30);
triangle(30,55, 45,85, 15,85);
fill(0,200,200);
triangle(70,55, 85,85, 55,85);
By default processing uses predetermined drawing styles. Lines are black. Fills are white. And the background is gray.
Single values between 0-255 produce shades of gray.
Three values together produce RGB color values (255,0,0).
Once you define a drawing style, processing will continue to draw with that style until a new style is defined.
Color and Transparency(RGBa)
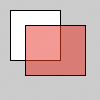
// begin processing example
rect(10, 10, 50, 50);
fill(255, 0, 0, 128);
rect(25, 25, 60, 50);
The fill color is set with 4 values. Processing recognizes this as Red, Green, Blue and ALPHA. The fourth number is the transparency value. This is set from 0-255 as well. A 0 value means fully transparent and 255 means fully opaque.
Custom Shape and Color (HEX)
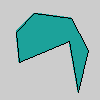
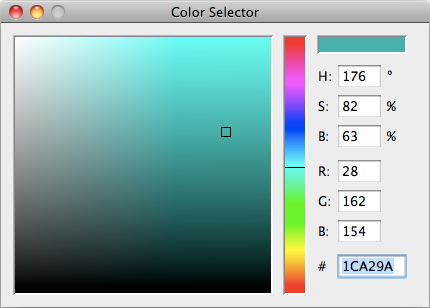
fill(#1CA29A);
beginShape();
vertex(34, 13);
vertex(71, 18);
vertex(88, 50);
vertex(78, 92);
vertex(69, 41);
vertex(19, 62);
vertex(16, 32);
endShape(CLOSE);
A color can also be represented by a single hexidecimal number. The color selector tool (found from the 'tools' pulldown menu) can be helpful in picking custom colors. It is possible to cut and paste the value into your code. When using a hex formated number, preceed the number with a number sign (#1CA29A).
Processing allows you to create arbitrary shapes. First, start a shape by using the 'beginShape' function. Add any number of vertexes you like, then end the shape with 'endShape'.
Interaction Effect: Draw Loop


(Image - click to see the interaction)
// begin processing example
void draw() {
background(mouseX/100.0 * 255.0);
}
Processing has 2 major structural functions you can add to your applets. If you add a draw function, it tells processing that the contents of the function should be run over and over again. A setup function will be executed only once as the applet begins to run.
The void keyword means that the draw function doesn't return a value. Functions are frequently used to caluclate a value and processing requires functions to define what type of value it will return (integer number, string of characters, etc).
The pair of parantheses after the draw functions name would be the place you pass arguments. In this case, draw and setup don't receive arguments. So the paratheses is left empty.
Blocks of code are grouped together with curly braces. In the example above, the draw function only includes a single line of code. You could include additional lines of code by placing it inside the block defined by the curly braces.
Notice that the argments for the background function are not prefined. Everytime the draw loop cycles, it calculates a new color value based on the X position of the mouse. The position of the mouse is stored automatically for you in variables called mouseX and mouseY.
The background function completely fills the canvas with the color you specify. If you drew something in a previous cycle, you won't be able to see it. If you do not call the background function, but continue to draw to the canvas, it can fill up completely.
Draw Loop 02


(Image - click to see the interaction)
// begin processing example
void draw() {
fill(255, 255, 255, 20);
line(mouseX, 20, mouseX, 80);
}
Here, instead of using the background function, we're simply drawing over the entire canvas with a semi-transparent filled rectangle. The resulting effect allows you to see previously drawn lines. The canvas stores the values of pixels once they're drawn. You should explore different ways to utilize this property.
Draw Beziers


(Image - click to see the interaction)
// begin processing example
void setup(){
smooth();
}
void draw() {
// fade out the canvas
noStroke();
fill(180, 180, 180, 20);
rect(0, 0, 100, 100);
// draw the control points of the curve
noFill();
stroke(200);
line(10,10,mouseX,mouseY);
line(10,90,90,90);
// draw the bezier curve
stroke(200,0,0);
bezier(10,10,mouseX,mouseY,10,90,90,90);
}
You should note the use of the smooth() function inside the setup function. Smooth turns on anti-aliasing. Try removing smooth() (by deleting or using comments) to see the difference.
Bezier curves are defined by anchor points and control points. The pair of values at the beginning and end of the arguments define the anchor points. The two pairs of values are the X and Y values of the control points. This applet draws lines between the anchor points and the control points to make the relationship clearer.
Processing also includes a function called curve(). The value of the curve function is that is allows you to specify points on the curve and processing will interpolate a curve to fit. The drawback of the curve function is that it doesn't draw the first and last points. Those points are used to define the incoming curvature.
Simple Effect: Blob
void setup() {
smooth();
}
void draw() {
background(0);
noStroke();
fill(255);
ellipse(20,15,35,35);
ellipse(16,28,40,40);
ellipse(50,30,40,40);
ellipse(80,70, 30, 30);
ellipse(mouseX,mouseY,45,45);
fill(141, 1,141);
ellipse(20,15,25,25);
ellipse(16,28,30,30);
ellipse(50,30,30,30);
ellipse(80,70, 20, 20);
ellipse(mouseX,mouseY,35,35);
fill(150);
ellipse(20,15,20,20);
ellipse(16,28,25,25);
ellipse(50,30,25,25);
ellipse(80,70, 15, 15);
ellipse(mouseX,mouseY,30,30);
}
By combining flow of control and color changes, we can achieve a simple blob effect. Each ellipse is drawn in same location with smaller radius. When the ellipses overlap, it appears that they're merging.