Week 03 :: Modularity, Reusability, Intro to Animation and Transformation
<< back to Procedural Morphology homepage
Arrays
• What is an Array?
• Creating an Array
• Using Arrays with loops
• Dimesions of an Array
Array Language Reference
Array Learning Examples
Two Dimensional Arrays
Creating and setting valuses in an array:
int[] sizes = new int[10];
for (int i=0; i<sizes.length; i++) {
sizes[i] = int(random(5, 50));
}
rectMode(CENTER);
for (int i=0; i<sizes.length; i++) {
rect((i+1)*9, 50, 10, sizes[i]);
}
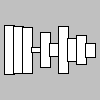
Hard coding an array:
int[] sizes = {10, 18, 28, 36, 44, 31, 37, 34, 28, 16};
rectMode(CENTER);
for (int i=0; i<sizes.length; i++) {
rect((i+1)*9, 50, 10, sizes[i]);
}
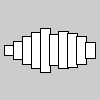
Reusing the values of an array:
int[] sizes = new int[100];
int target = 36;
for (int i=1; i<sizes.length; i++) {
sizes[i] = round (sin(i/16.0) *20 +30 );
}
for (int i=0; i<sizes.length; i++) {
stroke(sizes[i]*2);
line(i, 65, i, 65-sizes[i]);
}
for (int i=0; i<sizes.length; i++) {
if (sizes[i] == target) {
ellipse(i, 85, 10, 10);
}
}
Multi-dimensional array:
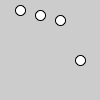
int[][] positions = {
{20,10},
{40,15},
{60,20},
{80,60}
};
smooth();
for (int i=0; i<positions.length; i++) {
ellipse(positions[i][0], positions[i][1], 10, 10);
}
Functions
• What is a Function?
• 3 Parts -- Return Type, Name, Arguments
• Passing Arguments -- By Value and By Reference
• Overloading
Function Learning Example
Void Keyword
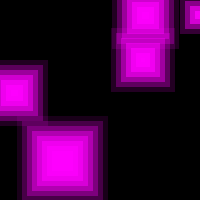
Function that doesn't return a value (void):
void setup() {
size(200, 200);
background(0);
rectMode(CENTER);
noStroke();
noLoop();
}
void draw() {
for (int i=0; i<5; i++) {
drawPyramid( random(200), random(200), random(10) );
}
}
void drawPyramid(float x, float y, float steps) {
for(float i=steps; i>0; i--) {
fill(#FF00FF, 255-i/steps*255);
rect (x,y,i*10,i*10);
}
}
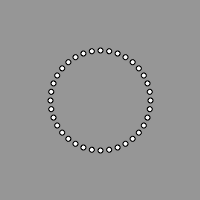
Function on an array (passed by reference):
float[] position = new float[2];
void setup() {
size(200, 200);
smooth();
noLoop();
}
void draw() {
background(150);
for (int i=0; i<36; i++) {
positionOnCircle(position, 100, 100, 100, 360/36*i);
ellipse(position[0], position[1], 5, 5);
}
}
float[] positionOnCircle (float[] p, float x, float y, float radius, float angle) {
float theta = radians(angle);
p[0] = x + 0.5 * radius * cos(theta);
p[1] = y + 0.5 * radius * sin(theta);
return p;
}
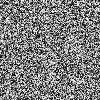
Random Values
Basic Random Function to Color a Pixel.
The random function accepts a range parameter and will produce a random value in that range. If only one parameter is given, it will produce a random value between 0-parameter. If two paramters are given, it will produce a value between those values.
int x;
void draw() {
for (int y=0; y < height; y++) {
stroke( random(255) );
point(x,y);
}
x++;
if (x >= width) {
noLoop();
}
}
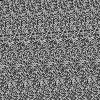
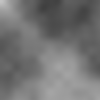
Noise Values
Noise values are a different way of producing random values that are more structured. It's based on Ken Perlin's noise algorithm. You'll notice a repeating pattern in the noise.
The noise function accepts X,Y,Z values for input parameters and produces a float between 0-1 as a result.
int x;
void draw() {
for (int y=0; y < height; y++) {
stroke( noise(x,y) * 255);
point(x,y);
}
x++;
if (x >= width) {
noLoop();
}
}
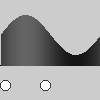
Noise Values Scaled
Noise becomes more interesting if you scale down the input values. The return value is still between 0-1, but the output is more natural -- peaks and valleys of intensity.
int x;
void draw() {
for (int y=0; y < height; y++) {
stroke( noise(x*0.015, y*0.015 ) * 255); // note that the input is scaled down.
point(x,y);
}
x++;
if (x >= width) {
noLoop();
}
}
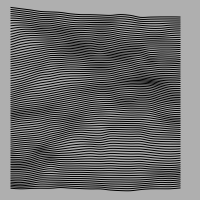
Applying Noise Values to Curve Points:
float y = 0;
void setup() {
size(200, 200);
background(175);
smooth();
noFill();
}
void draw() {
beginShape();
for (int i=0; i<width; i+=10) {
curveVertex(i, y+ noisePosY(i, y));
}
endShape();
if (y > height-30) {
noLoop();
} else {
y+=2;
}
}
float noisePosY (float _x, float _y) {
float r;
r = noise(_x/width*2, _y/height*2) * 30;
return r;
}
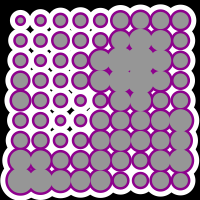
Noise Value Z input
Here the "Z" input value is attached to the mouse Y position. The X and Y values are the same, but the Z changes. As you move the mouse, you'll see the noise function move smoothly.
float diameter;
void setup() {
size(200,200);
ellipseMode(CENTER);
smooth();
}
void draw() {
background(0);
noStroke();
fill(255);
blobGrid(0.015, 15);
fill(141, 1,141);
blobGrid(0.015, 5);
fill(150);
blobGrid(0.015, 0);
}
void blobGrid(float scaling, float offset) {
for (int x=20; x < width; x+=20) {
for (int y=20; y < height; y+=20) {
diameter = noise(x*scaling, y*scaling, mouseY*scaling) * 40 + offset ;
ellipse(x,y,diameter,diameter);
}
}
}
Animation
• Nature of the canvas in processing
• Persistence of vision
float ballX = 50;
float ballY = 50;
float ballXspeed = 1.25;
float ballYspeed = -1;
int ballSize = 10;
void setup() {
size(200, 200);
background(150);
smooth();
}
void draw() {
background(150);
// update ball position
ballX += ballXspeed;
ballY += ballYspeed;
// check for collisions
if(ballX > width || ballX < 0) {
ballXspeed *= -1;
ballSizeY = 30;
}
if(ballY > height || ballY < 0) {
ballYspeed *= -1;
ballSizeX = 30;
}
// draw the ball
stroke(0);
strokeWeight(5);
ellipse(ballX, ballY, ballSize, ballSize);
}
// applet variables
float[] position = new float[2];
float posT;
// bezier points
float p1x = 20;
float p1y = 100;
float p2x = 50;
float p2y = 50;
float p3x = 150;
float p3y = 150;
float p4x = 180;
float p4y = 100;
//////////////////////////////////////////////////////////////
void setup() {
size(200, 200);
smooth();
ellipseMode(CENTER);
}
//////////////////////////////////////////////////////////////
void draw() {
background(175);
// draw the basic curve
p3x = mouseX;
p3y = mouseY;
noFill();
bezier (p1x, p1y, p2x, p2y, p3x, p3y, p4x, p4y);
// draw the circle on the curve
fill(255);
pointTOnBezier(position, posT);
ellipse(position[0], position[1], 10, 10);
// update the position on curve
// t is a decimal value in a range 0.0 -- 1.0
posT += 0.025;
if (posT > 1) {
posT = 0;
}
}
////////////////////////////////////////////////////////////
float[] pointTOnBezier(float[] p, float t) {
p[0] = pow(1-t,3)*p1x + 3*pow(1-t,2)*t*p2x + 3*(1-t)*pow(t,2)*p3x + pow(t, 3)*p4x;
p[1] = pow(1-t,3)*p1y + 3*pow(1-t,2)*t*p2y + 3*(1-t)*pow(t,2)*p3y + pow(t, 3)*p4y;
return p;
}
Transformation
• How the origin, rotation and scale work in processing
Translate() reference
Rotate() reference
Scale() reference
To store and retrieve the state of transformation (particularly for saving the default) use pushMatrix and popMatrix.
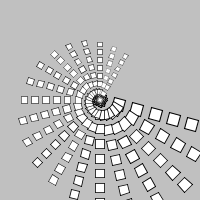
void setup() {
size(200, 200);
rectMode(CENTER);
smooth();
noLoop();
}
void draw() {
translate(100,100);
for (int i=0; i<20; i++) {
rotate(radians(15));
scale(.95);
drawSquares();
}
}
void drawSquares() {
for (int i = 0; i < 8; i++) {
rect(i*20, 0, 12, 12);
}
}
Working with External Files

To load external files into an applet, place your files in a "data" folder under the folder containing your PDE file. For security reasons, processing will not load files found elsewhere on your system. For this reason, you will need to save your PDE file before running it.
From the data folder, you can load images. Supported formats include JPG, PNG, TIFF, GIF, and TGA. Animated GIFs will only render the first frame.
The PImage variable type contains your raw image data. You can use the loadImage() function to load the image data into a PImage variable.
The image() function draws the image to the canvas. Pass the PImage variable to image() as the first argument.
A PImage can be passed to the background() function instead of a color, but note that the image data needs to match the size of the canvas or an error will occur.
Loading Images
The following example loads an image called miami1.jpg and draws it to the canvas.
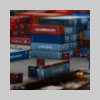
PImage myPic;
myPic = loadImage("miami1.jpg");
image(myPic, 10, 10);
Images with Transparency
Images are rectangles, but you may use formats with transparent backgrounds for non-rectalinear shapes. Formats that support transparency include PNG, TIFF, TGA and GIF. PNGs should be your favored format for this purpose unless you need to use a different format for a specific reason.
This example loads an image called dot.png, draws one to the center of the stage, and then draws another animated copy over it.
PImage myPic;
int posX = -25;
void setup() {
myPic = loadImage("dot.png");
}
void draw() {
background(255);
image(myPic, 25, 25);
posX++;
if (posX > width) {
posX = -25;
}
image(myPic, posX, 25 + tan(radians(posX*2))*10);
}
Loading Vector Files
Processing has added support for SVG, a vector file format. The workflow for adding an SVG to your applet is the almost the same as adding an image. Vectors require a PShape variable to hold the drawing data instead of a PImage. The loadShape() function will load SVG data into your PShape variable and the shape() function draws the shape to the canvas.
Processing does not currently support gradients or SVG filters in your SVG data.
The value of using vector data is the ability to scale without loosing image quality. For comparison, click here to see the same animation completed with a png image.
The example below loads an SVG file called face.svg. SVG file can easily be created in Adobe Illustrator. Here is the original drawing in illustrator.
PShape myShape;
int s = 1;
void setup() {
size(200,200);
myShape = loadShape("face.svg");
smooth();
}
void draw() {
background(200);
translate(width/2, height/2);
s++;
scale(0.25 + abs(sin(radians(s))*3 ));
rotate(cos(radians(s)));
shape(myShape, -55, -55, 100, 100);
}
Working with Text
Processing is somewhat quirky when it comes to drawing text to the screen, but it's not a difficult task. First you will need a VLW formatted font file. Rather than use the vector information found in traditional true type or postscript font files, Processing needs an image based font. The VLW font contains the characters of a font, pre-rendered as bitmap data. The VLW file needs to be placed in a data folder under your saved sketch.
To create a VLW font file, choose 'Create Font...' under the 'Tools' menu in processing.
The 'Create Font' dialog box is very straight forward. Choose the font you want to use, determine the size you want to use and click 'OK'.
NOTE: Once you click 'OK', it may take a couple of minutes to create your rendered font file and the dialog box may look like it has crashed. Just let it run a few minutes. Each character is being rasterized, and depending on the speed of your system, this could take few minutes.
Once you have a VLW file created, you will need a PFont variable to hold the font data. Use the loadFont() function to retrieve your VLW file, and use the textFont() function to set the font and size. The text() function draws the text to the canvas.
The textFont() function works similarly as setting the fill color. You are setting the drawing style for processing to use for all the following text() function calls until you change the style.
If you include a second argument for textFont() you can change the size from the default size in which the font was created to any size you want. Keep in mind, however, that the font will look best at the size it was created. You may notice that the smaller font in the example below does not look as sharp (particularly the lower case 'e').
Loading Text
The following example uses Consolas-48.vlw

PFont myFont;
myFont = loadFont("Consolas-48.vlw");
textFont(myFont);
text("text", 10, 50);
textFont(myFont, 30);
text("text", 10, 80);
Assignment for next week.
Exercise #3: Drawing the 'Many'
Create an applet in processing in which multiple copies of the same item (or very similar copies) combine to create a visual field or effect. The applet should take advantage of functions. It can be animated or interactive.
Reading:
New Structure and the Informal by Cecil Balmond